
TEXTURING UNWRAP UVW MAP
Sunday, September 21, 2008
This tutorial needs you to understand basic use of 3dsmax.
Unwrap UVW is used only to match faces with appropriate texture. Now, in this tutorial I will explain 8 steps how to texture an object using Unwrap UVW. You can use these techniques for almost any object needed to be textured, especially if you want to texture a low poly model for games.
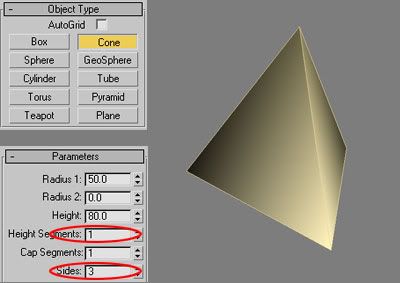
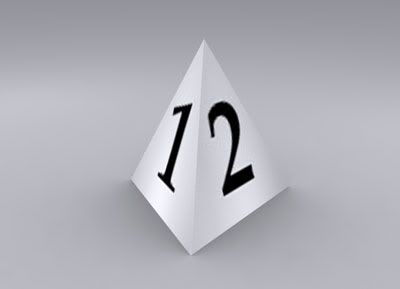
First, we need an object to be textured. For purpose of this tutorial, we will use simple object. Open 3dsmax and create a cone in Top Viewport.Then, click on Modify tab. Use these values: Radius 1=50, Height=80, Height Segments=1 and Sides=3. You will get object like image below. We will apply different texture for each side. Although simple, this object will be difficult to texture using common UVW Map. You may think this object can be textured using Multi-SubObject material. Yes, it can! But you must apply UVW Map modifier to each sub-object face and must consider adjust UVW Gizmo on each side. That would be a frustating thing to do. Ok, we will begin to use Unwrap UVW to texture an object:
STEP 1: APPLY UNWRAP MODIFIER
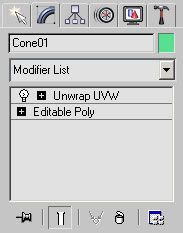
First, right click object and convert it into Editable Poly. When you want to use Unwrap UVW, it is better to apply it to Editable Poly object. Then, in Command Panel, activate Modify tab. Choose Unwrap UVW from modifier list to apply to object.
STEP 2: GIVE NAME TO FACES
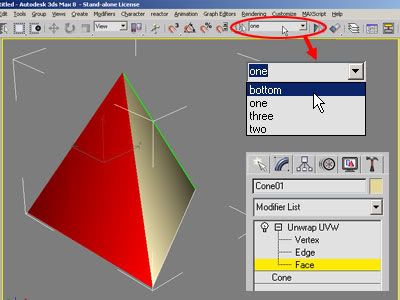
This step can be skipped. But I advice that you don't, especially when your object is too complex. When you name faces, you can select them later with ease. In modifier stack, click plus (+) sign on right of Unwrap UVW. Select Faces row. Now select one face in viewport, then fill a name on Named Selection Sets textbox on top of the screen. After you fill the name, don't forget to press Enter on keyboard. Repeat the same process with other faces untill all faces are named. For example, in this tutorial, you will have 4 named selection sets, eq 'one', 'two', 'three' and 'bottom'. Note: For other object, usually faces to be named are continuous faces that share the same texture. For example, you have a human object, you can select all faces that build a head and name them.
STEP 3: DEFINE EACH FACES TO THEIR PROPER MAPPING TYPE
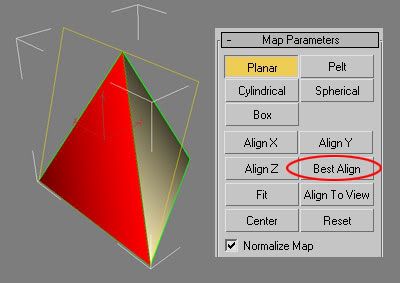
Remember that you gave name to faces in Step 2. This is where they can come in handy. Make sure you are still in faces selection. On Named Selection Sets on top of the screen, select one of your previously named faces, for example 'one'. Then, in Map parameters rollout click Planar button and click Best Align. Map gizmo (yellow lines) should be adjusted like image below. Continue the same process with other named faces.Note: For other object: define mapping type based on selected faces. For example, if you select all head faces usually the proper mapping type is Cylindrical. Also, try Best Align first before you aligning mapping gizmo, because usually Best Align good for most stuation.
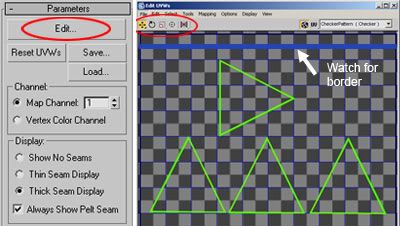
STEP 4: MOVE AND SCALE PROJECTED FACES IN EDIT UVW'S WINDOW
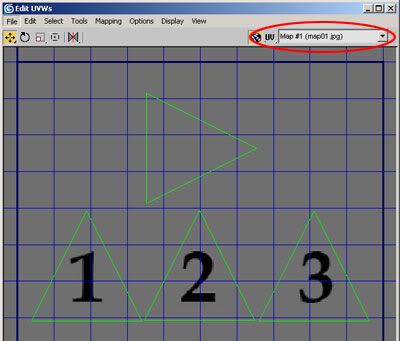
After you have defined each faces to its proper mapping type, you should look at Edit UVW's window. In rollout Parameters, click Edit button to open Edit UVW's window. In this window, you will get picture of each face's projection.In 3dsmax, these projections are called mapping clusters or UVW clusters. But their position intersect each other. Still in Faces selection, choose one of your face's name in Named Selection Set. Selected projected face will be highlighted in red color. Then using tools provided at top left of this window, you can scale and move all projected faces to fit the window. Remember to watch the dark border. You should not put your projected faces over this border. The damned thing is this border is hard to find. Tips: Go to Options>Advanced Options. Uncheck Tile Bitmap option and therefore you can see the border.
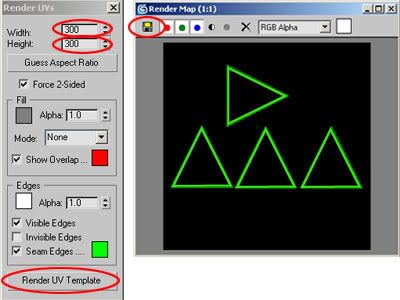
STEP 5: RENDER UV TEMPLATE
After all projected faces are all in right position in Edit UVWs window, go to Tools>Render UV Template. Small dialog box will be opened. Set Width and Height then click Render UV Template Window. Rendered template opened in different window. You can save as an image.
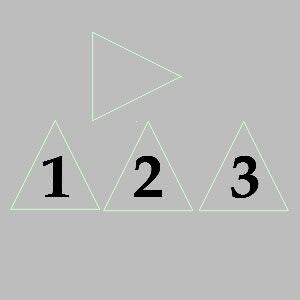
STEP 6: DRAW YOUR OWN TEXTURE
Open saved rendered uv template in graphic editor software, eq Photoshop. Use this image as reference for your drawing. Image below show simple texture created based on rendered uv template. This texture will be used in Diffuse Color Channel. Save your texture as bitmap image.
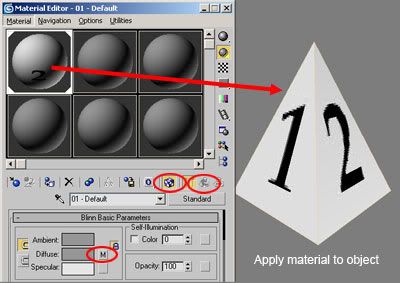
STEP 7: CREATE AND APPLY MATERIAL
Back to 3dsmax. Open Material Editor (press M in keyboard). Create material based on image texture you have created and apply to object. For this tutorial, in Blinn Basic Parameters, click small button right of Diffuse. Another window will appear. Click on Bitmap and choose your texture image. Click Go to Parent button once to go back to previous rollout. Don't forget to activate Show Map in Viewport if you want material appear in viewport. To apply material, simply click and drag sample material to object.
STEP 8: ADJUST IF NECESSARY
Sometimes we need to adjust projected faces position in Edit UVWs window. Go to Edit UVWs window. Click on drop-down list on top right window. Choose Pick Texture than choose your bitmap texture as background. Now, you can easily move vertex or faces to fit the mapping cluster to image map.
source : http://www.tutorialized.com/
Unwrap UVW is used only to match faces with appropriate texture. Now, in this tutorial I will explain 8 steps how to texture an object using Unwrap UVW. You can use these techniques for almost any object needed to be textured, especially if you want to texture a low poly model for games.
First, we need an object to be textured. For purpose of this tutorial, we will use simple object. Open 3dsmax and create a cone in Top Viewport.Then, click on Modify tab. Use these values: Radius 1=50, Height=80, Height Segments=1 and Sides=3. You will get object like image below. We will apply different texture for each side. Although simple, this object will be difficult to texture using common UVW Map. You may think this object can be textured using Multi-SubObject material. Yes, it can! But you must apply UVW Map modifier to each sub-object face and must consider adjust UVW Gizmo on each side. That would be a frustating thing to do. Ok, we will begin to use Unwrap UVW to texture an object:

STEP 1: APPLY UNWRAP MODIFIER
First, right click object and convert it into Editable Poly. When you want to use Unwrap UVW, it is better to apply it to Editable Poly object. Then, in Command Panel, activate Modify tab. Choose Unwrap UVW from modifier list to apply to object.

STEP 2: GIVE NAME TO FACES
This step can be skipped. But I advice that you don't, especially when your object is too complex. When you name faces, you can select them later with ease. In modifier stack, click plus (+) sign on right of Unwrap UVW. Select Faces row. Now select one face in viewport, then fill a name on Named Selection Sets textbox on top of the screen. After you fill the name, don't forget to press Enter on keyboard. Repeat the same process with other faces untill all faces are named. For example, in this tutorial, you will have 4 named selection sets, eq 'one', 'two', 'three' and 'bottom'. Note: For other object, usually faces to be named are continuous faces that share the same texture. For example, you have a human object, you can select all faces that build a head and name them.

STEP 3: DEFINE EACH FACES TO THEIR PROPER MAPPING TYPE
Remember that you gave name to faces in Step 2. This is where they can come in handy. Make sure you are still in faces selection. On Named Selection Sets on top of the screen, select one of your previously named faces, for example 'one'. Then, in Map parameters rollout click Planar button and click Best Align. Map gizmo (yellow lines) should be adjusted like image below. Continue the same process with other named faces.Note: For other object: define mapping type based on selected faces. For example, if you select all head faces usually the proper mapping type is Cylindrical. Also, try Best Align first before you aligning mapping gizmo, because usually Best Align good for most stuation.

STEP 4: MOVE AND SCALE PROJECTED FACES IN EDIT UVW'S WINDOW
After you have defined each faces to its proper mapping type, you should look at Edit UVW's window. In rollout Parameters, click Edit button to open Edit UVW's window. In this window, you will get picture of each face's projection.In 3dsmax, these projections are called mapping clusters or UVW clusters. But their position intersect each other. Still in Faces selection, choose one of your face's name in Named Selection Set. Selected projected face will be highlighted in red color. Then using tools provided at top left of this window, you can scale and move all projected faces to fit the window. Remember to watch the dark border. You should not put your projected faces over this border. The damned thing is this border is hard to find. Tips: Go to Options>Advanced Options. Uncheck Tile Bitmap option and therefore you can see the border.

STEP 5: RENDER UV TEMPLATE
After all projected faces are all in right position in Edit UVWs window, go to Tools>Render UV Template. Small dialog box will be opened. Set Width and Height then click Render UV Template Window. Rendered template opened in different window. You can save as an image.

STEP 6: DRAW YOUR OWN TEXTURE
Open saved rendered uv template in graphic editor software, eq Photoshop. Use this image as reference for your drawing. Image below show simple texture created based on rendered uv template. This texture will be used in Diffuse Color Channel. Save your texture as bitmap image.

STEP 7: CREATE AND APPLY MATERIAL
Back to 3dsmax. Open Material Editor (press M in keyboard). Create material based on image texture you have created and apply to object. For this tutorial, in Blinn Basic Parameters, click small button right of Diffuse. Another window will appear. Click on Bitmap and choose your texture image. Click Go to Parent button once to go back to previous rollout. Don't forget to activate Show Map in Viewport if you want material appear in viewport. To apply material, simply click and drag sample material to object.

STEP 8: ADJUST IF NECESSARY
Sometimes we need to adjust projected faces position in Edit UVWs window. Go to Edit UVWs window. Click on drop-down list on top right window. Choose Pick Texture than choose your bitmap texture as background. Now, you can easily move vertex or faces to fit the mapping cluster to image map.


source : http://www.tutorialized.com/


0 comments: to “ TEXTURING UNWRAP UVW MAP ”
Post a Comment