

Showing posts with label VRay. Show all posts

BASIC CAUSTIC WITH VRAY PLUGINS
Thursday, October 2, 2008

in this tutorial, we'd better using 3ds max's plug ins, V-Ray
i setup the scene, create a box, and a torus knot
added a spot light
- shadows on (vray shadows)
- under vray parameters check the smooth surface shadows
i’m not gonna explain everything what i did, you can see for you self if you download the scene
and render the scene out, you should have something like :

now first off we’ll create some materials, so get into the material editor and seleect a new material, change it it vray material
- change reflection and refraction color to white
- check Fresnel reflections
- choose a very licht blue color as Fog color
- set fog multi. to 0.01
- check Affect shadows
assign it to the torus knot
now create a other material, also a vray material
for diffuse color select a light grey
and if you render you have something like this :

now we are missing the caustics, here we go:
get your vray renderer and goto vray:system
click light settings and select spot01
click “generate caustics” on
subdivs : 2500
multi : 100000.0
now go back to the render dialog and search for vray:caustic tab
click “on”
multi. : 4
search dist. : 0.4
max photon : 2000
and render it out you should get something like :

to get some better caustics change to
multi. : 2
search dist. : 0.4
max photon : 2500
also change the under vray:system -> lightsettings > spot01 caustics subdive to 5000
also add a meshsmooth to the torus (render Iter. 2)
then render it out
this is gonna take long, calculating the caustics but well,

source : http://www.cg-files.com/
WATER MATERIAL WITH VRAY PLUGINS
in this tutorial, we'd better using 3ds max's plug ins, V-Ray.
1. Open Material Editor by pressing M on your keyboard.
2. Click on Get Material button, and chouse Vray material from Materail/Map Browser
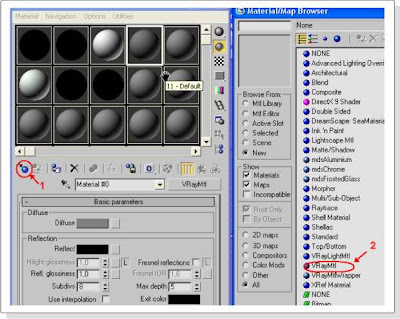
3. Rename material to “Water”
4. Click on Diffuse color, and set to black.

5. For the Reflect color use this settings: Red 232, Blue 232, Green 232
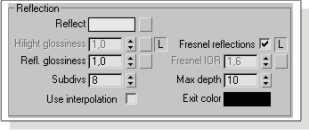
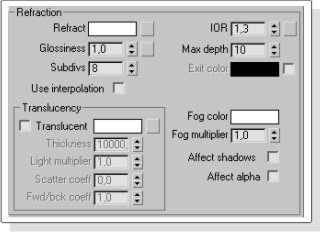
6. In the Refraction menu change Refract color to pure white and change Max depth to 10. See picture below.
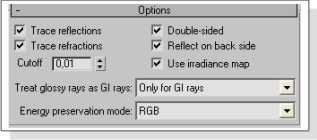
7. Scroll down and find Options menu. Just turn on “Reflect on back side”
That is all. Like I said this material is for V-ray. Just to know, results of this material while you render also depend from your Render and Lighting settings
source : http://www.cg-files.com/
1. Open Material Editor by pressing M on your keyboard.
2. Click on Get Material button, and chouse Vray material from Materail/Map Browser

3. Rename material to “Water”
4. Click on Diffuse color, and set to black.

5. For the Reflect color use this settings: Red 232, Blue 232, Green 232

6. In the Refraction menu change Refract color to pure white and change Max depth to 10. See picture below.

7. Scroll down and find Options menu. Just turn on “Reflect on back side”

That is all. Like I said this material is for V-ray. Just to know, results of this material while you render also depend from your Render and Lighting settings
source : http://www.cg-files.com/
TEXTURING GLASS WITH VRAY PLUGINS
Sunday, September 21, 2008
First, bring up the Render Scene dialog (hit F10) and switch to vRay renderer
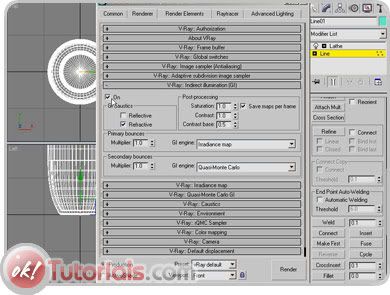
Go to the Renderer tab and check the On box under the V-Ray: Indirect Illumination (GI) rollout.
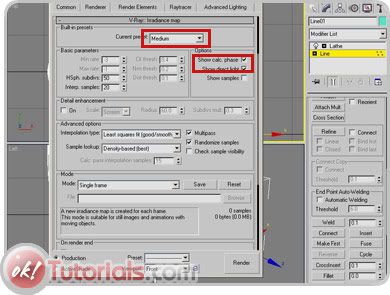
Next, under the V-Ray: Iradiance map rollout set the Current Preset to Medium and check the Show calc. phase and Show direct light boxes.
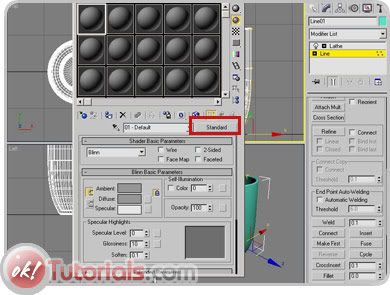
Now hit M to bring up the Materials. Select one of the slots at the top then hit the Standard button to change the material type.
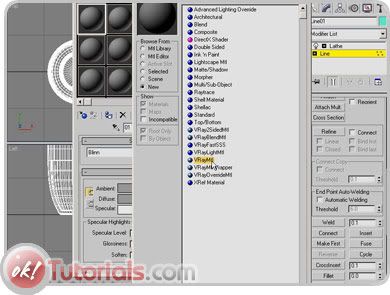
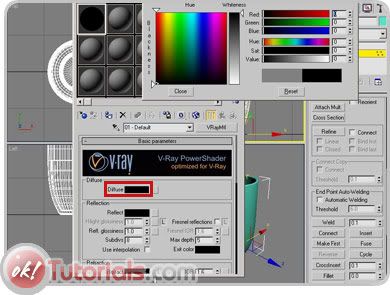
Now set the Diffuse color to 0, 0, 0 (black).
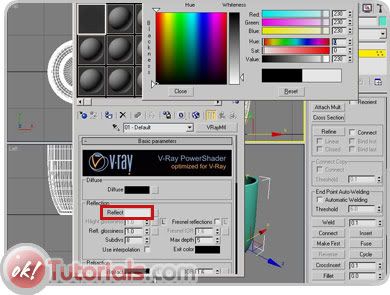
Set the Reflect color to 230, 230, 230.
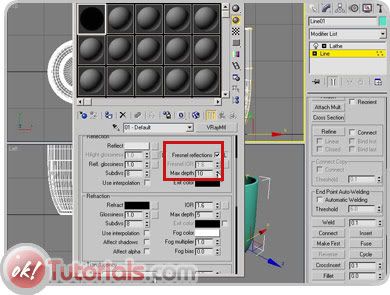
Under the Reflection rollout check the Fresnel reflections box and set the Max Depth to 10.
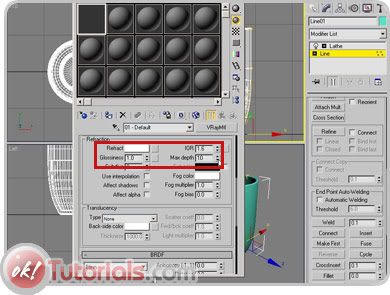
Just below, under the Refraction rollout set the Refraction color to 255, 255, 255 (white) and the Max Depth to 10.
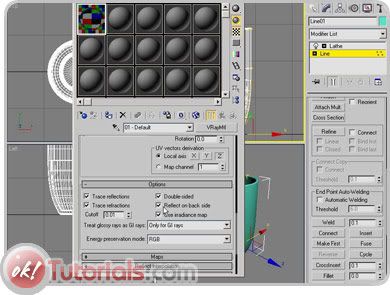
Finally, under the Options rollout check the Reflect on back side box.
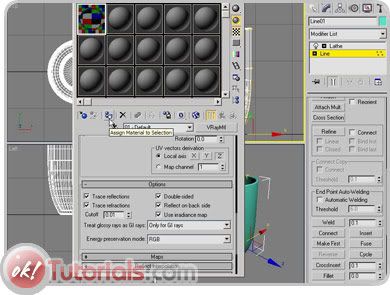
With the glass object selected, hit the Assign Material to Selection button.
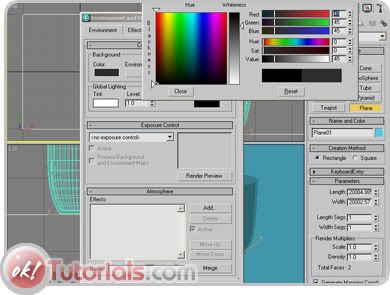
Bring up the Environment and Effects dialog by hitting "8" on your keyboard. Set the Background Color to 45, 45, 45.
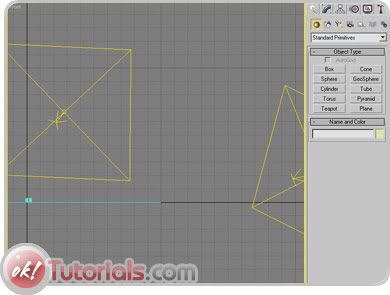
Your glass scene is pretty much done. For better results add a couple of vRay lights with large surfaces and maybe a few more objects.
source : http://www.tutorialized.com/

Go to the Renderer tab and check the On box under the V-Ray: Indirect Illumination (GI) rollout.

Next, under the V-Ray: Iradiance map rollout set the Current Preset to Medium and check the Show calc. phase and Show direct light boxes.

Now hit M to bring up the Materials. Select one of the slots at the top then hit the Standard button to change the material type.


Now set the Diffuse color to 0, 0, 0 (black).

Set the Reflect color to 230, 230, 230.

Under the Reflection rollout check the Fresnel reflections box and set the Max Depth to 10.

Just below, under the Refraction rollout set the Refraction color to 255, 255, 255 (white) and the Max Depth to 10.

Finally, under the Options rollout check the Reflect on back side box.

With the glass object selected, hit the Assign Material to Selection button.

Bring up the Environment and Effects dialog by hitting "8" on your keyboard. Set the Background Color to 45, 45, 45.

Your glass scene is pretty much done. For better results add a couple of vRay lights with large surfaces and maybe a few more objects.
source : http://www.tutorialized.com/


