
CUSTOMIZING YOUR WOOD FLOOR - PARQUET MATERIAL
Saturday, October 18, 2008
Introduction:
Floor is one of the elements contained in Architecture. Floor Covering Materials are several kinds, such as, concrete, ceramics, marble, steel plate, glass, wood, and etc. One of the floor covering material that we will learn is the wood. There are 2(two) Wood Floor Form, regular, and irregular form. As a form of regularity; collated row, and a row, this form of a general often found on the pier wood floor, this form of order and the board tend to be rigid. While the form of irregularly used to show effects thus do not feel certain monoton, for example, on the parquet floor. This tutorial will guide you on how to make the cover material from the wood floors (parquet), and I assume that this tutorial is intended for the beginner level and understand the use of basic software on the'3dsMax ' very well.
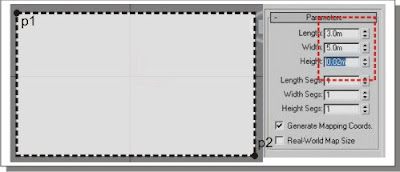
1) Go to 3dsMax software, and start by creating a box with the size of a thick; 0:02 m, 5 m in length and width of 3 m. (on the scale of the size of the box that we will use as a floor, you can set you up). Then give the name of the object box with the 'floor'.
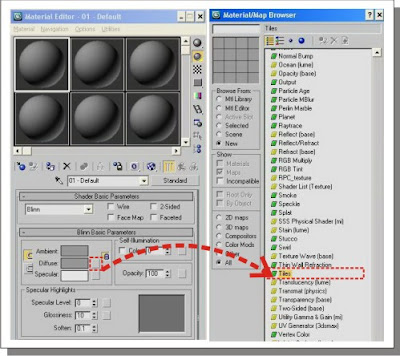
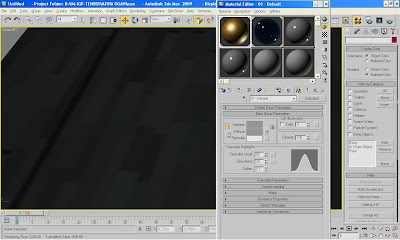
2) Press' M 'on your keyboard to display the Material / Map Browser,' then change the settings without any application of material standard slot on the objects' floor '. Click the left slot on the material standards, hold, then slowly move the object on the 'floor'. Back in the Material / Map Browser, click on the 'diffuse' so it appears a 'floating bar' new slide 'slidebar' to down to the choice of 'Tiles' left click twice to applicate it to the material.
3) Once selected, in the 'Standard Controls' select' Custom Tiles '.
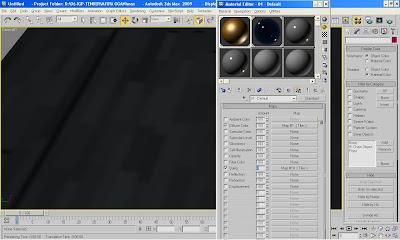
4) In the 'Advanced Controls' values change from the' horiz and Vert Count 'to; 20 for' horiz Count 'and 100 in the' Vert Count '. besides that, change the 'Color variance' to 0.5, 'Horizontal Gap' and 'Vertical Gap' to 0:01. (This step is to set the scale pattern that will become a reference for the texture of the object).
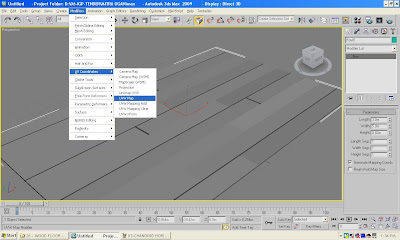
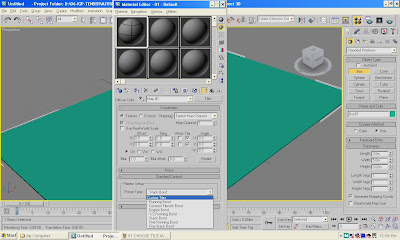
5) Then we will create 'UVW Map' menu by selecting 'modifier', 'UV Coordinates,' and select 'UVW Map' (This step is the implementation of how the size scale of the texture of the object. Remember the value of the amount must be greater than the size of the object was 3 mx 5 m so that the texture is done repeatedly, but not monoton).
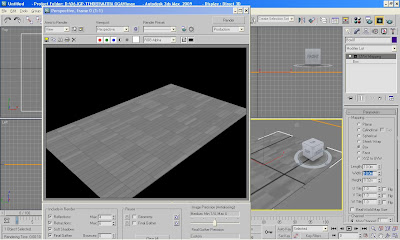
6) Select 'Mapping' box on the 'Sidebar Menu' to the right of the screen, visible 'UVW Map Paremeters', and change paremeters to 10 m for' Length 'and 10 m for' Width '.
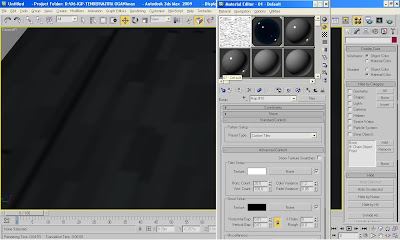
7) Click the '-' in the 'Standard Control' to undermine the menu. And on the menu 'Advanced Controls' slide' sidebar 'slow-down menu to' Stacking layout '. Modifications' Line Shift 'and' Random Shift to be 0.0 and 1.2. (This step is to change the basic pattern that we will use that to be random and not uniform).
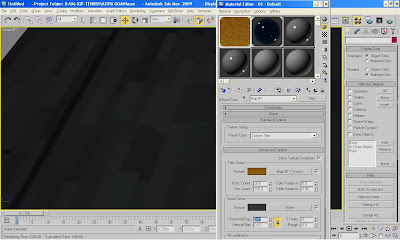
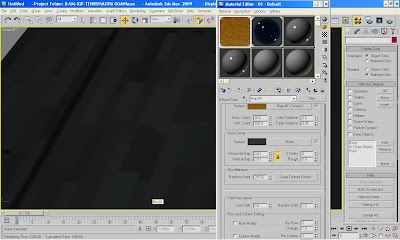
8) Back in the 'Tiles setup', click on the left side of the box 'none' to the new menu appears. Then gently slide the 'sidebar' down to the 'Wood,' and left click twice to apply. Once the menu appears Material Editor 'change options' Source' to "Explicit Channel Map 'and' Map Channel 'to 2, and' Grain Thickness' to 2.5. (This step is to create a 'layer' in the new 'Tile Map' with the motive timber).

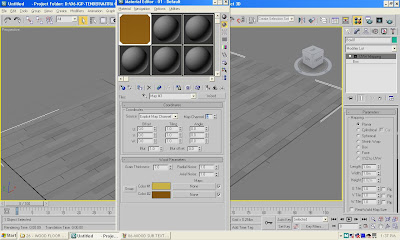
09) To complete the defenition from 'Explicit Channel Map' 2, make 'UVW Map' over new 'UVW Map' existing. Select 'Mapping' box on the 'Sidebar Menu' to the right of the screen, visible 'UVW Map Paremeters', and change paremeters to 10 m for' Length 'and 10 m for' Width '..
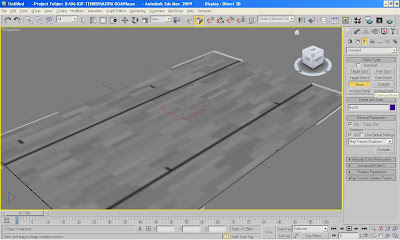
10) Then press' F9 'to see the results of' rendering 'temporary. Well, enough already seen what we have modifications required?
11) To have the texture of the object can be seen on the screen, create a light 'Omni' on the screen. Then specify its position above the objects' floor 'so that the texture can be seen properly.
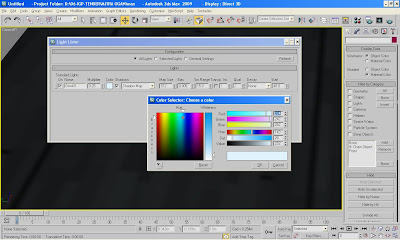
12) Make modifications in the light paremeter 'Omni' menu by pressing 'tools', and' Light Lister 'as shown in the picture above.
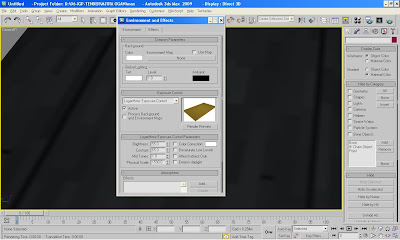
13) To make the environment a more realistic texture, specify the options' Exposure Control 'by pressing'8' on the keyboard. Select 'Logaritmic Exposure Control' and change paremeter appropriate image.
14) Back in the Material Editor 'with the' M ', change' Specular Highlight Paremeter 'to 80 for' Specular Level 'and 20 for' Glossiness'. (This step is to create the texture of the object 'floor' to become more shiny, reflective and slightly).
15) Still on the options' Material Editor 'slide' slidebar 'to the menu' Maps', then copy the 'Diffuse Color' menu to 'Bump' with the way the left click 'Map # 1 (Tiles)' on 'Diffuse Color' resistance click on the left and gently slide down to the 'Bump'. (This step is done to create objects become visible, such as three-dimensional (3d)).
16) Click setting 'Bump' which is copied, change the color texture into 'white', and 'grout Setup' to the color of 'black'.
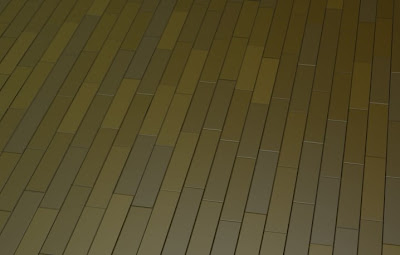
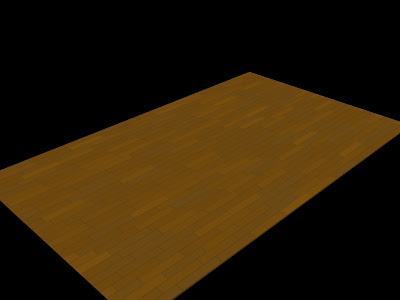
17) You can see the results of this tutorial.
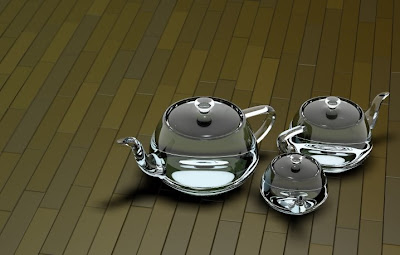
Floor is one of the elements contained in Architecture. Floor Covering Materials are several kinds, such as, concrete, ceramics, marble, steel plate, glass, wood, and etc. One of the floor covering material that we will learn is the wood. There are 2(two) Wood Floor Form, regular, and irregular form. As a form of regularity; collated row, and a row, this form of a general often found on the pier wood floor, this form of order and the board tend to be rigid. While the form of irregularly used to show effects thus do not feel certain monoton, for example, on the parquet floor. This tutorial will guide you on how to make the cover material from the wood floors (parquet), and I assume that this tutorial is intended for the beginner level and understand the use of basic software on the'3dsMax ' very well.

1) Go to 3dsMax software, and start by creating a box with the size of a thick; 0:02 m, 5 m in length and width of 3 m. (on the scale of the size of the box that we will use as a floor, you can set you up). Then give the name of the object box with the 'floor'.

2) Press' M 'on your keyboard to display the Material / Map Browser,' then change the settings without any application of material standard slot on the objects' floor '. Click the left slot on the material standards, hold, then slowly move the object on the 'floor'. Back in the Material / Map Browser, click on the 'diffuse' so it appears a 'floating bar' new slide 'slidebar' to down to the choice of 'Tiles' left click twice to applicate it to the material.

3) Once selected, in the 'Standard Controls' select' Custom Tiles '.

4) In the 'Advanced Controls' values change from the' horiz and Vert Count 'to; 20 for' horiz Count 'and 100 in the' Vert Count '. besides that, change the 'Color variance' to 0.5, 'Horizontal Gap' and 'Vertical Gap' to 0:01. (This step is to set the scale pattern that will become a reference for the texture of the object).

5) Then we will create 'UVW Map' menu by selecting 'modifier', 'UV Coordinates,' and select 'UVW Map' (This step is the implementation of how the size scale of the texture of the object. Remember the value of the amount must be greater than the size of the object was 3 mx 5 m so that the texture is done repeatedly, but not monoton).

6) Select 'Mapping' box on the 'Sidebar Menu' to the right of the screen, visible 'UVW Map Paremeters', and change paremeters to 10 m for' Length 'and 10 m for' Width '.

7) Click the '-' in the 'Standard Control' to undermine the menu. And on the menu 'Advanced Controls' slide' sidebar 'slow-down menu to' Stacking layout '. Modifications' Line Shift 'and' Random Shift to be 0.0 and 1.2. (This step is to change the basic pattern that we will use that to be random and not uniform).

8) Back in the 'Tiles setup', click on the left side of the box 'none' to the new menu appears. Then gently slide the 'sidebar' down to the 'Wood,' and left click twice to apply. Once the menu appears Material Editor 'change options' Source' to "Explicit Channel Map 'and' Map Channel 'to 2, and' Grain Thickness' to 2.5. (This step is to create a 'layer' in the new 'Tile Map' with the motive timber).

09) To complete the defenition from 'Explicit Channel Map' 2, make 'UVW Map' over new 'UVW Map' existing. Select 'Mapping' box on the 'Sidebar Menu' to the right of the screen, visible 'UVW Map Paremeters', and change paremeters to 10 m for' Length 'and 10 m for' Width '..

10) Then press' F9 'to see the results of' rendering 'temporary. Well, enough already seen what we have modifications required?

11) To have the texture of the object can be seen on the screen, create a light 'Omni' on the screen. Then specify its position above the objects' floor 'so that the texture can be seen properly.

12) Make modifications in the light paremeter 'Omni' menu by pressing 'tools', and' Light Lister 'as shown in the picture above.

13) To make the environment a more realistic texture, specify the options' Exposure Control 'by pressing'8' on the keyboard. Select 'Logaritmic Exposure Control' and change paremeter appropriate image.

14) Back in the Material Editor 'with the' M ', change' Specular Highlight Paremeter 'to 80 for' Specular Level 'and 20 for' Glossiness'. (This step is to create the texture of the object 'floor' to become more shiny, reflective and slightly).

15) Still on the options' Material Editor 'slide' slidebar 'to the menu' Maps', then copy the 'Diffuse Color' menu to 'Bump' with the way the left click 'Map # 1 (Tiles)' on 'Diffuse Color' resistance click on the left and gently slide down to the 'Bump'. (This step is done to create objects become visible, such as three-dimensional (3d)).

16) Click setting 'Bump' which is copied, change the color texture into 'white', and 'grout Setup' to the color of 'black'.

17) You can see the results of this tutorial.


October 20, 2008 at 11:14 PM
Great Tutorial, i love the way you set up the tiling for the floor panels, but what about getting the wood grains to show up. If i could get the detail of the wood in there this would be spot on.
November 2, 2008 at 1:31 PM
Cool,Cool jadi kepikiran belajar 3d max juga...
December 15, 2008 at 5:06 PM
@Chris:
In the tiles setup you can for example choose a wooden bitmap for texture.
February 27, 2009 at 2:37 PM
This is a very very good tutorial. I hope you will post more and thank you for sharing.
March 25, 2009 at 3:47 PM
What a nice and informative article. Its a nice tutorial. Thank you for posting.
August 17, 2009 at 7:29 PM
It doesn't work for me. :(
September 20, 2009 at 3:57 PM
wood floor parquet
What a nice and informative article. Its a nice tutorial. Thank you for posting. www.danskgulvcenter.dk
December 28, 2009 at 7:57 PM
Great article as for me. I'd like to read something more about that matter. Thanx for sharing this material.
Sexy Lady
Russian Escorts London
May 15, 2010 at 2:44 AM
this is a great tut but if you decide you want to put a bitmap texture of wood, how do you match up the tiling with your bitmap?
September 19, 2010 at 3:28 PM
Intresting story you public here.
It will be useful to find something more concerning this post.
Thx you for inform that information.
With best regards Mila!!
ukranian escort
May 27, 2011 at 6:01 PM
Nike Air Max Wildwood Supreme
Nike Air Max Turbulence
Nike Air Max Skyline
Nike Air Max Goadome
Nike Air Max Fitsole
Nike Air Max Zenyth
Nike Air Max Boots
Nike Air Max Zoom Kobe
Nike Air Max Tn
Nike Air Max Presto
Nike Air Max BW
Nike Air Max 24 7
Nike Air Max 2011
Nike Air Max 2009
Nike Air Max 95
Nike Air Max 91
Nike Air Max 87
Nike Air Max 180
Nike Air Max Griffey Max 1
Nike Air Max 90
Nike Air Max 1
Nike Air Max 2011
Nike Air Max Shoes
Nike Air Max
May 27, 2011 at 6:05 PM
Nike Air Max Wildwood Supreme
Nike Air Max Turbulence
Nike Air Max Skyline
Nike Air Max Goadome
Nike Air Max Fitsole
Nike Air Max Zenyth
Nike Air Max Boots
Nike Air Max Zoom Kobe
Nike Air Max Tn
Nike Air Max Presto
Nike Air Max BW
Nike Air Max 24 7
Nike Air Max 2011
Nike Air Max 2009
Nike Air Max 95
Nike Air Max 91
Nike Air Max 87
Nike Air Max 180
Nike Air Max Griffey Max 1
Nike Air Max 90
Nike Air Max 1
Nike Air Max 2011
Nike Air Max Shoes
Nike Air Max
May 27, 2011 at 6:06 PM
Nike Air Max Wildwood Supreme
Nike Air Max Turbulence
Nike Air Max Skyline
Nike Air Max Goadome
Nike Air Max Fitsole
Nike Air Max Zenyth
Cool Nike Air Max Boots
Nike Air Max Zoom Kobe
Nike Air Max Tn
Nike Air Max Presto
Classic Nike Air Max Bw
Nike Air Max 24 7
Nike Air Max 2011
Nike Air Max 2009
Wholesale Nike Air Max 95 Shoes
Nike Air Max 91
Nike Air Max 87
Nike Air Max 180
Nike Air Max Griffey Max 1
Nike Air Max 90
Nike Air Max 1
Nike Air Max 2011
Nike Air Max Shoes
Nike Air Max
July 29, 2011 at 8:47 PM
Said was wonderful, really the best site! Liked by the way best described 2011 Nike soccer cleats.Prefer the
cheap nike football boots.
August 3, 2011 at 10:00 PM
Your Mademoiselle escorts agency is select the most charming, friendly and the finest London escorts for our Escort gallery and provide the best escort services in London.
August 9, 2011 at 3:17 PM
Your Escort Agency offers exclusive and most beautiful London escort girls of various nationalities.
August 23, 2011 at 10:31 AM
Thank you for your article to share with us, our online store Nike Outlets, have a good product Nike Air Max shoes, interested welcome to come in and see 2011 Cheap Nike Air Max Online Store 90 Premium uses a ample air cushioning assemblage at the heel which is arresting from the ancillary of the midsole in Air Max 90 Premium a lot of models,which acutely use the air and is the best assure arrangement if the shoes encouter the attack.
August 29, 2011 at 1:50 AM
Bestescort4U more then ten years providing best London escorts companionship in the UK.
September 1, 2011 at 1:57 AM
Hot - Collection is a honest and confidential London escort agency which provides genuine London escorts girls for gentlemen of taste.
September 14, 2011 at 10:29 PM
Ah good exciting content! Will always come to our attention. To bring you good news-works perfect! Nike soccer cleats best shoes 2011!! And the most beautiful New nike soccer shoes . with the most fashionable nike mercurial superfly.
November 16, 2011 at 1:36 AM
Only Pleasures is a well established and respected London escort agency. We are pride of ourselves on having the most exquisite selection of escort girls in London for your pleasure…
November 29, 2011 at 12:09 PM
Great tutorial on the floor installation, well written and easy to understand. Thanks for posting.
December 5, 2011 at 7:15 PM
Escort of London agency a well-established and respected agency. We have a great selection of girls in London for your pleasure.