TEXTURING YOUR BRICK MATERIAL STEP BY STEP
Friday, October 3, 2008
Brick is one of the Popular material that we usually often used in 3ds Max world. The brick’s application as wall constructor or wall exspose. Behind as Architectural element, the bricks usually used in the Game and Industry. This tutorial will guide u how to make your own bricks material step by step, and I assume that it really works for the beginner, and have a great understanding of basic geometry. Enjoy it.
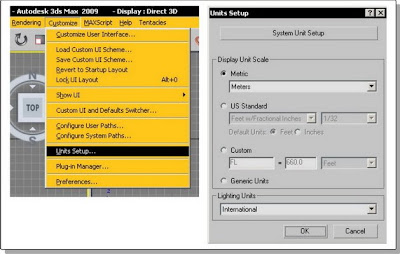
1). First, we have to made some decision to use Default Standard Unit that we have. I use Metric Unit, especially in Meter, if u usually often use inch and feet u can use it too. with some modification.
choose CUSTOMIZE >>> UNITS SETUP
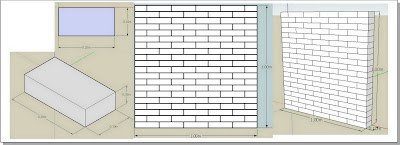
2). Then, we have try to understanding the brick’s material module, I use brick’s module in length 20 cm, width 10 cm, and height 5 cm. this module’ll be used to fill the Main Material Module as the wall’s texture. In this case, I use square unit (m2), so amount of brick’s module for square are 100 pieces, with the composition in 5 horisontal line, and 10 vertical line row. With this square module, that we used for any variable dimentional wall, so the basic square module’ll be match it. To understanding that, u can see this picture ;
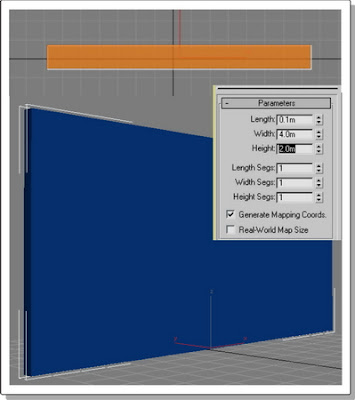
3). After that, we go to 3ds Max. Make a box with the length and height what ever u wanted, but still use the width in 10 cm. in this tutorial I use dimention in length 4 m, width 0.1 m, and height 2 m.
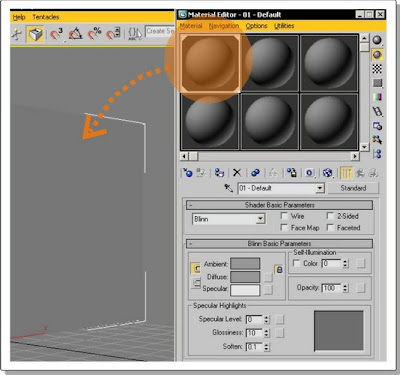
4). Open up the Material Browser, choose the Default Shader, and applied it to wall.
5). Create an Omni to light up the wall, do some modification such as; change the light’s position to made the wall clearly sight, then change the Omni’s Basic Paremeter, decrease the light intensity, and change the light color too.
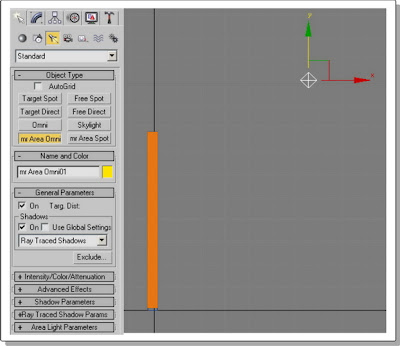
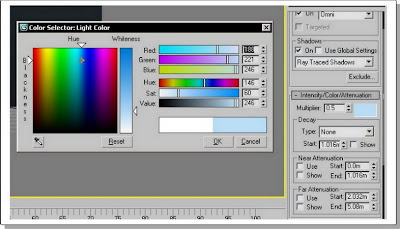
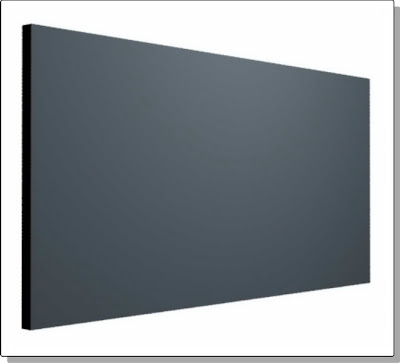
6). After the light ready, keep on to modificate the tile’s material which is as the wall’s maodule.

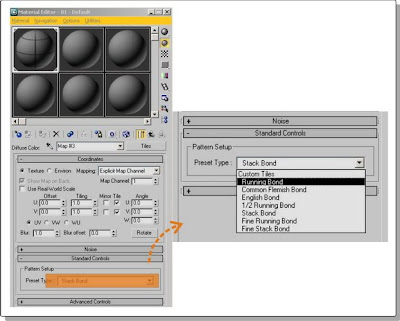
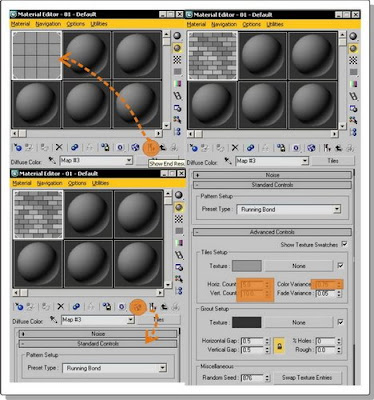
7) Non activated End Result Material, so the brick’s pattern looks clearly, then have some modification in Horizontal Count’s paremeter to 5, and the vertical Count to 10. This module that’ll be used as our basic pattern, then change the Color Variance’s paremeter to 0.75, so the pattern not really looks monoton.
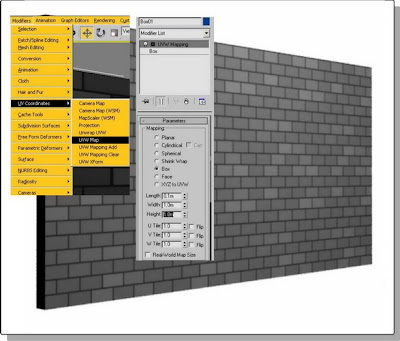
8). To fit the brick’s material to exsisting wall, use UVW Map, and choose box. Then change the width and heigh paremeters to 1 m. This setting will be used as main pattern for the brick’s wall how many the dimention is, the pattern still in square module with Tile Map pattern.
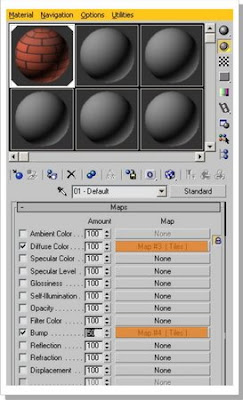
9). For better result, made some modification, tile texture could be matched color u like, and the emboss effect can be produced with the bump map. After that, back to the material/map browser, in sub map copy the diffuse setting to bump setting and change the paremeter to 50


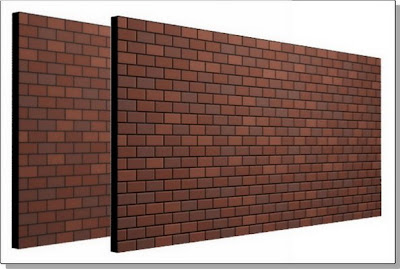
10). Last step is render the scene to get the final render
1). First, we have to made some decision to use Default Standard Unit that we have. I use Metric Unit, especially in Meter, if u usually often use inch and feet u can use it too. with some modification.
choose CUSTOMIZE >>> UNITS SETUP

2). Then, we have try to understanding the brick’s material module, I use brick’s module in length 20 cm, width 10 cm, and height 5 cm. this module’ll be used to fill the Main Material Module as the wall’s texture. In this case, I use square unit (m2), so amount of brick’s module for square are 100 pieces, with the composition in 5 horisontal line, and 10 vertical line row. With this square module, that we used for any variable dimentional wall, so the basic square module’ll be match it. To understanding that, u can see this picture ;

3). After that, we go to 3ds Max. Make a box with the length and height what ever u wanted, but still use the width in 10 cm. in this tutorial I use dimention in length 4 m, width 0.1 m, and height 2 m.

4). Open up the Material Browser, choose the Default Shader, and applied it to wall.

5). Create an Omni to light up the wall, do some modification such as; change the light’s position to made the wall clearly sight, then change the Omni’s Basic Paremeter, decrease the light intensity, and change the light color too.


6). After the light ready, keep on to modificate the tile’s material which is as the wall’s maodule.


7) Non activated End Result Material, so the brick’s pattern looks clearly, then have some modification in Horizontal Count’s paremeter to 5, and the vertical Count to 10. This module that’ll be used as our basic pattern, then change the Color Variance’s paremeter to 0.75, so the pattern not really looks monoton.

8). To fit the brick’s material to exsisting wall, use UVW Map, and choose box. Then change the width and heigh paremeters to 1 m. This setting will be used as main pattern for the brick’s wall how many the dimention is, the pattern still in square module with Tile Map pattern.

9). For better result, made some modification, tile texture could be matched color u like, and the emboss effect can be produced with the bump map. After that, back to the material/map browser, in sub map copy the diffuse setting to bump setting and change the paremeter to 50


10). Last step is render the scene to get the final render


October 3, 2008 at 10:50 PM
easy to understand,succes
October 5, 2008 at 5:03 PM
I Have add U Link. thanks Bro
October 6, 2008 at 2:31 AM
wah..... blognya english habis.... nice to know u bro.... i'll add u're link to my blog..... just a minute ok! ^_^
October 6, 2008 at 8:09 AM
COOL TUTORIAL!!!
October 7, 2008 at 12:01 PM
Very skillful and attractive...thx for visiting my blog
October 10, 2008 at 3:49 PM
what a great tutorial!!
October 16, 2008 at 8:18 PM
Alloww avatarinside....ini dari denish nehhh..www.denishmahendaz.tk
buka donk denish blog denish...coz denish ngasih PR buat Avatar inside..jadi mohon buka blog Denish..ntar tau deh PR yang denish Kasih Buat Avatarinside...berupa Award..please mampir
October 18, 2008 at 10:13 AM
i love this blog. it's so informative.
http://in-rich.blogspot.com
December 4, 2008 at 9:19 PM
this is very good :) thanks
December 27, 2008 at 10:38 AM
bos, gimana caranya kalo yang dikasih brick itu box persegi panjang? hasilnya gak bagus untuk dua sisi yg lain. trims infonya. keren tutorialnya.
January 2, 2009 at 8:13 PM
"bos, gimana caranya kalo yang dikasih brick itu box persegi panjang? hasilnya gak bagus untuk dua sisi yg lain. trims infonya. keren tutorialnya."
pada dasarnya masih sama saja menggunakan pattern 1 m2. misal objek 3 m x 4.5 m x 0.15 m, pattern 1 m2 (1 m x 1 m) akan memenuhi bidang model tersebut.
mohon diingat untuk pilihan mapping objek, aktifkan opsi "2 side" jadi sisi sebalikny jg di mapping. kemudian pada opsi "UVW Mapping" menggunakan pilihan "box".
smoga dapat membantu,
regards.
December 1, 2011 at 9:14 PM
Hey, there's so much useful material above!
September 24, 2012 at 1:33 AM
Great tutorial, thanks for sharing