TEXTURING UVW AND UNWRAP UVW MAPS
Thursday, October 2, 2008
 This tutorial'll teach u a couple of methods to use to texture ur objects in 3ds Max. Texturing an object is understood as the process of adding skin and colour to an object. We're goin' to use UVW and Unwrap UVW Maps to texture ur objects in this tutorial. This method involves the creation of 2D map that's 'glued' to our 3D model. You're assumed to have the basic knowledge on how to model your own objects in 3ds Max.
Part I - Create and Apply Textures using UVW and UnWrap UVW Maps
The first part of this tutorial will teach you how to texture using UVW and UnWrap UVW Maps. Using this method we will first apply standard materials to certain parts of our model to distinguish between different parts of it and then make 2D UVW Maps out of these models that we can edit using any external image editor. These images created using our external image editor are then easily applied to our materials to fit perfectly on our model. The procedure will now be explained step by step.
Open the file that you downloaded, you should see the model on the screen. We will first texture the house only, so start off by hiding all the other objects on the scene. You do this by clicking on the Display Tab, and accessing the Hide panel from there.
 Use We will start by applying generic materials to distinguish between the different parts of the model, we have to create these before we apply them. Hit "M" on your keyboard to open the "Material Editor". Select a free a slot in there and change the type from "Standard" to "Multi/Sub-Object". Name the material "House" (We are going to texture the body of the house first).
Notice that you get 10 Sub-Materials by default, change that to 6 and click on "Set Number". Name the Sub-Materials below in accordance to the different walls the house house, for the sake of the tutorial, name them in this order: Front, Back, Left, Right, Top, Rest. Notice the ID Number next to each of the Sub-Materials, we are going to use this later on. For now however, change the colour of each material using the "Colour Selector", just use a different colour for each of the materials, we need to distinguish them from each other.
 It is now time to assign the materials that we have created to our model. Click on the "Assign To Selected" button (). In the "Modify Tab", change the selection mode to "Polygon", now select all the outer polygons of the front wall of the house by holding CTRL and then selecting the walls, make sure you don't select the inner polygons of the windows and the door though. Now that you have the front wall selected, find the "Polygon Properties" rollout menu, and set the "SetID" field to "1". The number 1 here is the ID Number of the Sub-Material we created earlier on for the front wall of the house, putting this ID number should assign the material that we created earlier to this part of the house.
Repeat the same process for the other four parts of the house (Back, Left, Right, and Top). You do this by selecting the polygons on a single wall and then setting the Material ID to them accordingly. If you have named your layers in the order that we suggested you should put these values to your walls, Back: ID 2, Right: ID 3, Left: ID 4, Top: ID 5. The rest of the polygons should be assigned to material ID 6.
 We now have different materials assigned to the different parts of our model. The next stage is creating textures for those Sub-Materials and then mapping them to the object. We will have to create a separate UVW Map for each of our materials, doing them on a turn, we will select the material, create a UVW Map, edit the map using an external image editor, and the map the texture to the object.
Select the house by clicking once on it and then access the "Modify Tab", and select the "Select Mesh" entry the "Modifier List". Change the selection mode to "Polygon", the enter the number "1" in the "Select Material by ID" field and then click on "Select" to select only the front wall part of the house.
 We will now add a UVW Map to the material we selected. Select the "UVW Map" entry from the "Modifier List", make sure it goes above the "Select Mesh" entry that we created earlier. Scroll down below and find the "Alignment" parameters, select "X" to align the projector map to the X-Axis and then click on "Fit" to make it the same size as the selected polygons. Finally, we have to make dimensions of the projector map a perfect square, because otherwise our UVW map will be distorted as it gest stretched to make a square when used. We can easily make the original dimensions of our map a square by pasting the value of the length as a the width as well. (Check the image below)
 We will now create our Unwrap Map, select the "Unwrap Map" entry from the "Modifier List". Find the Parameter" rollout menu and then click on "Edit". You should see the UVW Mapping for the selected polygons only in the Edit UVWs window. This is the front wall of the house, notice the holes in the centre that make up the windows and the door.
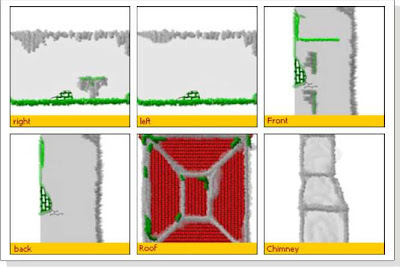
 If u're making ur own model & texture from scratch u'd have to copy this image and paste it in ur image editing software to draw ur map there. You can simply press Alt+Print Screen to take a snap shot of the active window. Pasting this in an image editor and then using the screenshot as a reference should be an easy job. Notice how I draw the texture on the wall in accordance to the holes that make up the windows and the door. Once u're done with it, save your new map as a JPG image. u don't have to do this for this tutorial as we have provided u with all the textures u need, but now u should know how to make these on ur own.
 Back to 3ds Max now, open the "Material Editor" and select the "House" Material. Click on the Sub-Material "Front", this should open up the properties panel of the material, click on the box next to "Diffuse", select "Bitmap" and then locate the image of the front wall (You downloaded this). The texture should be already applied now to the front wall of the house, click on the "View in Viewport" button () in the "Material Editor"to be able to view what you have just done in the view port.
Our first wall is done! it looks cool. u can repeat the process for the rest of the walls of the house, here's a small reminder:
1. Select the "Select Mesh" entry from they "Modifier List" in the "Modify Tab". Select the polygons "by Material" enter the ID number of the material used, e.g. "2" for the "back" wall.
2. Select the "UVW Map" entry from the "Modifier List", align the projector to selected polygons, resize the projector map by fitting it to the selected polygons, and finally make sure that the project map size is a
perfect square in dimensions.
3. Select the "Unwrap Map" entry from the "Modifier List", click on "Edit" to open the "Edit UVWs Window".
4. Take the screenshot of this and edit it using an external image editing software, draw the texture on it.
5. Open the "Material Editor", select material ID for the texture, and locate the texture that you have for it.
The files for these textures have been included in the file that you have downloaded at the beginning of this tutorial. I made a texture for the chimney as well, you can unhide it from the Display Tab and then apply the material to it the same way you did to the walls.

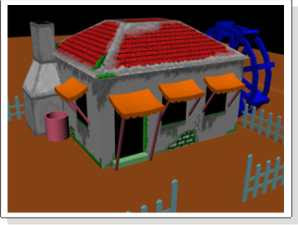
Once you're done, unhide all the objects and you should get a similar scene to the one displayed below.

Source : http://www.oman3d.com/


0 comments: to “ TEXTURING UVW AND UNWRAP UVW MAPS ”
Post a Comment